Honda Fit/Jazz - Clutch Slave Cylinder Replacement (5MT)
Clutch Slave Cylinder Replacement
NOTE:
- Use fender covers to avoid damaging painted surfaces.
- Do not spill brake fluid on the vehicle; it may damage the paint; if brake fluid does contact the paint, wash it off immediately with water.
| 1. | Write down the frequencies for the radio's preset buttons. Disconnect the negative (-) cable first, then the positive (+) cable from the battery. Remove the battery.
|
Remove the air cleaner housing.
| 3. | Remove the battery tray.
 |
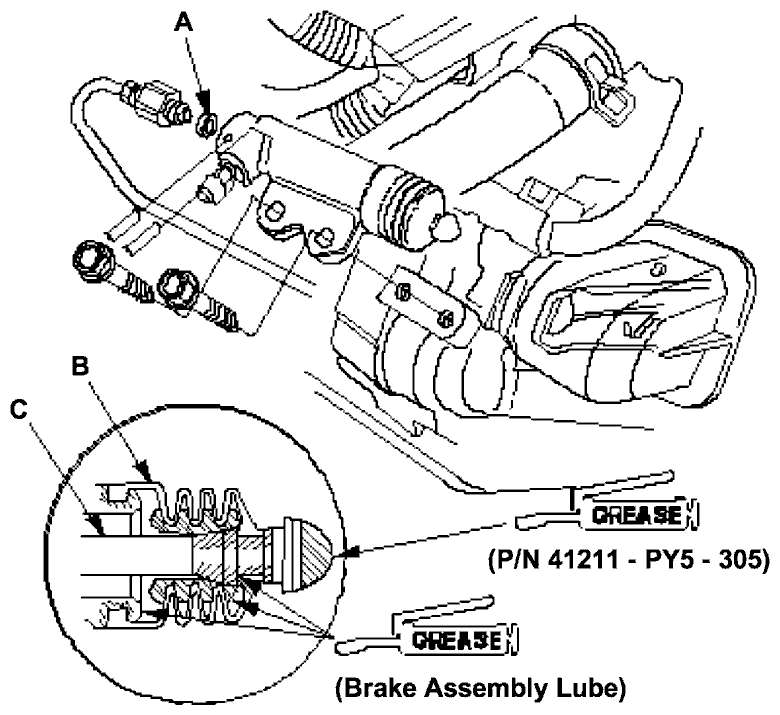
| 4. | Remove the mounting bolts (A) and the slave cylinder (B).
 |
| 5. | Remove the roll pins (C). Disconnect the clutch line (D), and remove the O-ring (E). Plug the end of the clutch line with a shop towel to prevent brake fluid from coming out.
|
| 6. | Install the slave cylinder in the reverse order of removal. Install a new O-ring (A).
 |
| 7. | Pull the boot (B) back, and apply brake assembly lube to the boot and slave cylinder rod (C). Reinstall the boot.
|
| 8. | Apply Urea Grease UM264 (P/N 41211-PY5-305) to the push rod of the slave cylinder. Tighten the slave cylinder mounting bolts to 22 N· m (2.2 kgf·m, 16 lbf·ft).
|
| 9. | Bleed the clutch hydraulic system.
- Attach a hose to the bleeder screw (A), and suspended the hose in a container of brake fluid.
- Make sure there is an adequate supply of fluid at the clutch master cylinder, then slowly pump the clutch pedal until no more bubbles appear at the bleeder hose.
- Tighten the bleed screw to 8 N·m (0.8 kgf·m, 5.8 lbf·ft); do not overtighten it.
- Refill the clutch master cylinder with fluid when done.
- Always use only Genuine Honda DOT 3 or 4 brake fluid.
 |
Honda Fit/Jazz 02-05 Workshop Manual
Back to all Manuals