Honda Fit/Jazz - Steering Gearbox Installation
Steering Gearbox Installation
| 1. | Center the steering rack within its stroke.
|
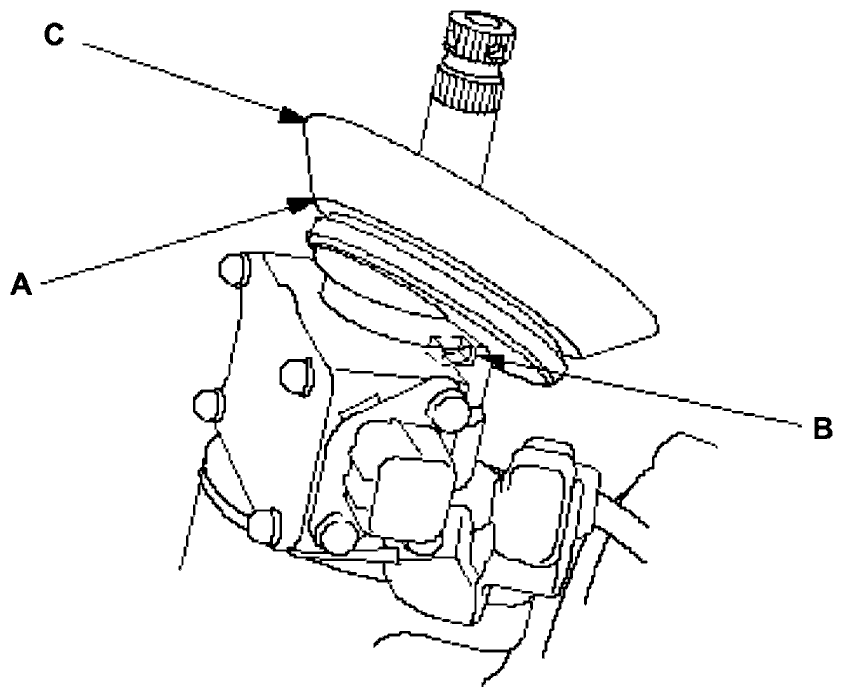
| 2. | Install the pinion shaft grommet (A) aligning the projection (B) with the cutout in the top of the torque sensor.
Turn out the lip (C) of the grommet to facilitate installation. Return the lip of the grommet after the operation of step 5.
 |
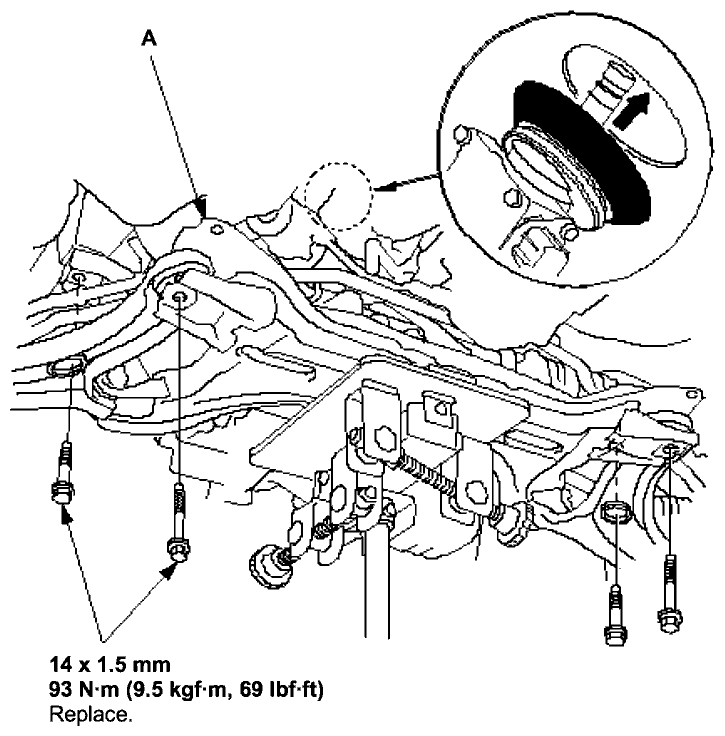
| 3. | Install the steering gearbox (A) on the front suspension subframe (B) with the stiffeners (C) and bracket (D).
NOTE: For equipped models, install the steering gearbox mounting bracket (E) with the stiffener and the washer (F) before installing the steering gearbox if it removed.
LHD:  
RHD: 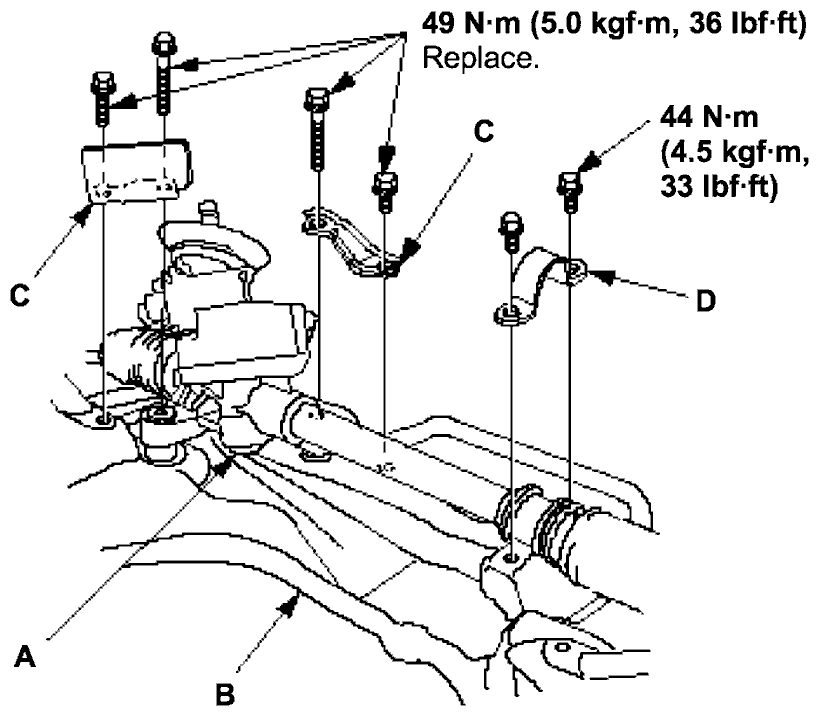
|
| 4. | Set the front suspension subframe (A) mounted with the steering gearbox on the transmission jack and support it.
 |
| 5. | Carefully raise the front suspension subframe with the jack, and pass the pinion shaft into the cabin.
NOTE:
- Be sure that the pinion shaft grommet is in place securely. Check whether the pinion shaft grommet is not turning up. Incorrect installation can cause leakage of water, mud, noise.
- Take care not to damage the lower arm ball joint boot with the edge of the knuckle, etc.
|
| 6. | Install the front suspension subframe with new 14 mm flange bolts, and tighten to the specified torque.
|
| 7. | Connect the transmission rear mount bracket (A) and rear mount (B) on the front suspension subframe with the support bolt.
 |
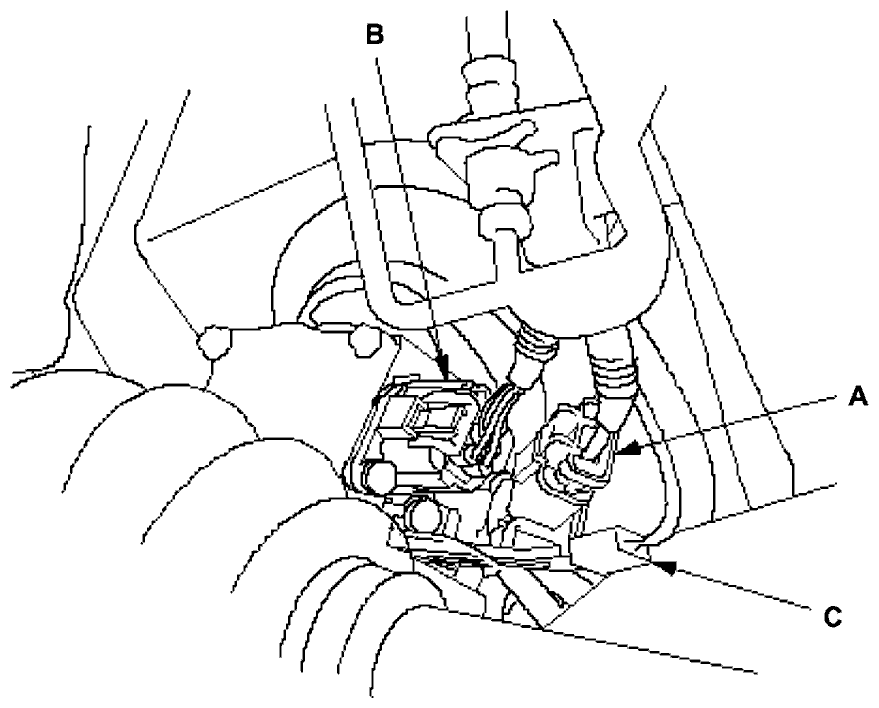
| 8. | Connect the motor 2P connector (A), EPS wire harness 6P connector (B) and steering gearbox 1P connector (C).
NOTE: Insert the connectors securely until the connector tabs lock (click). Loose connection or leaving the connectors not connected will cause poor assist performance.
 |
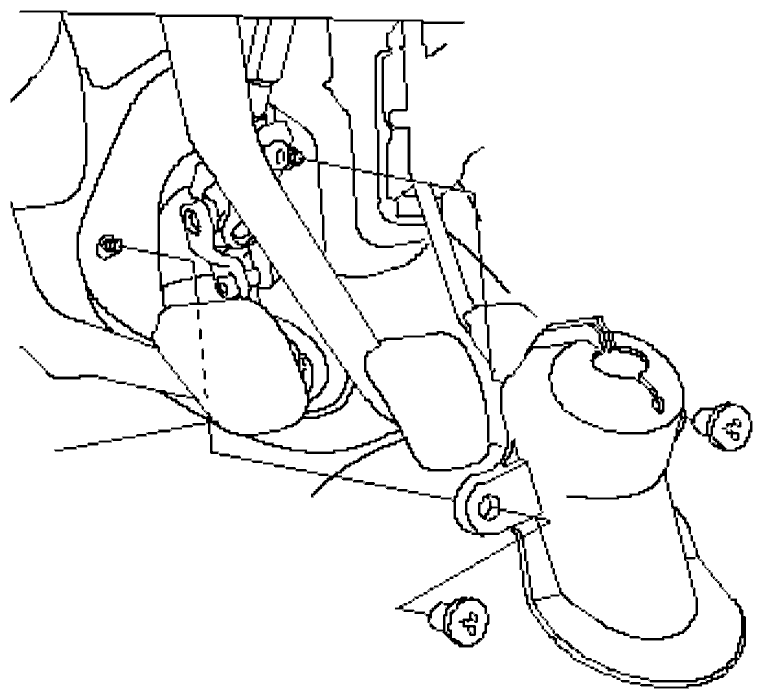
| 9. | Install the heated oxygen sensor (HO2S) cord clip (A) on the gearbox housing.
 |
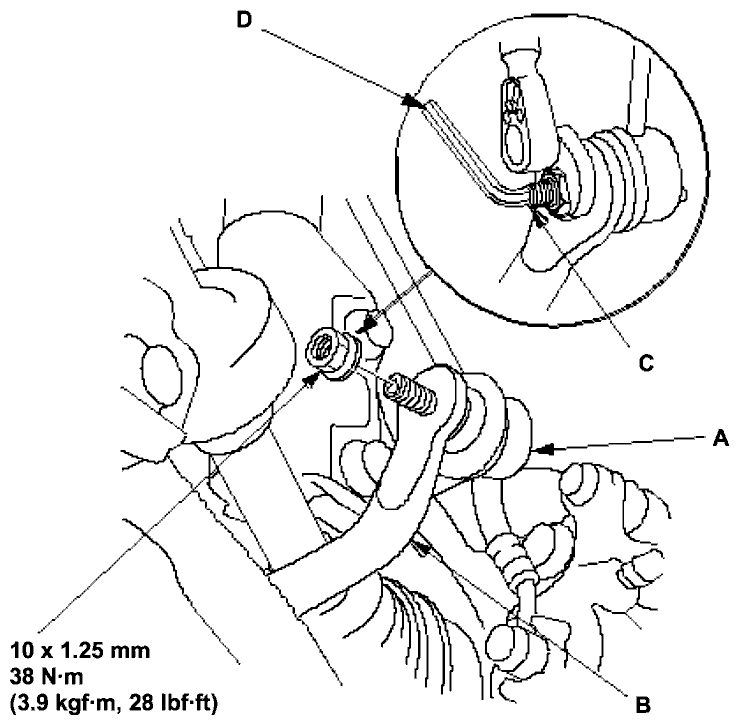
| 10. | Connect the stabilizer links (A) to the stabilizer bar (B). Tighten the new self-locking nuts while holding the joint pin (C) with a hex wrench (D).
NOTE: Tighten all mounting hardware to the specified torque values.
 |
| 11. | Wipe off any grease contamination from the ball joint tapered section and threads. Then reconnect the tie-rod end (A) to the knuckle arms. Install the 10 mm nut (B) and tighten it.
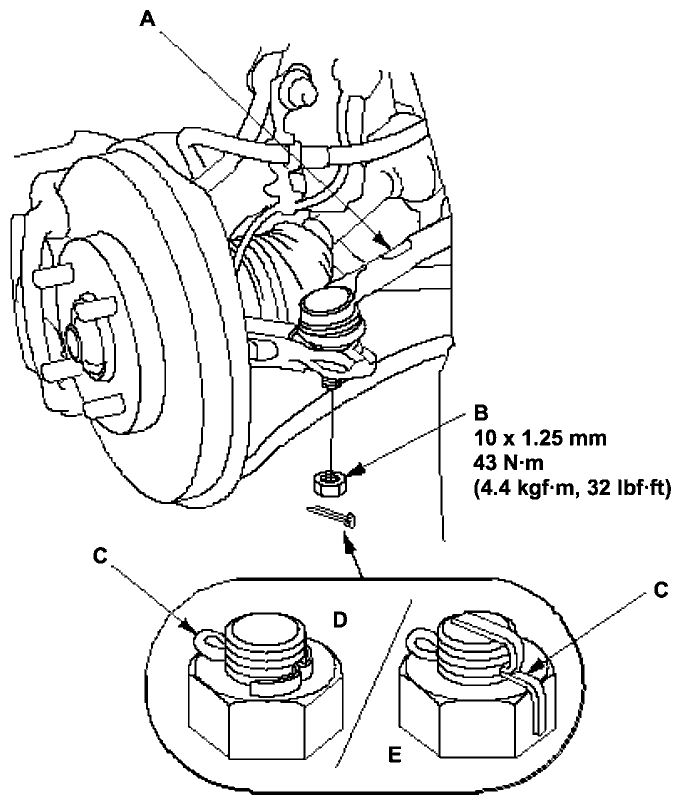 |
| 12. | Install a new cotter pin (C), and bend it as shown (D) or (E).
|
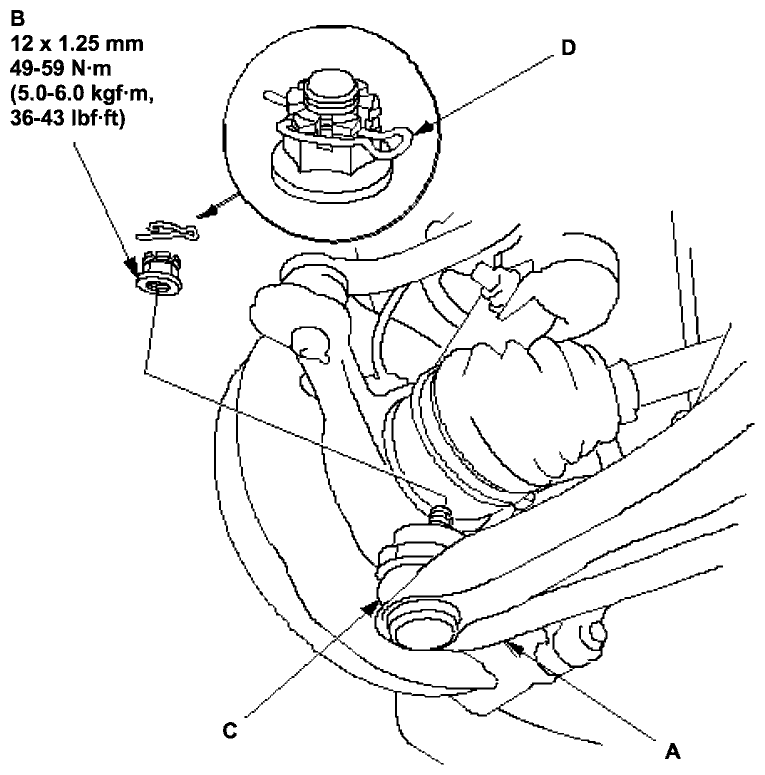
| 13. | Wipe off any grease contamination from the lower arm ball joint tapered section and threads.
Then reconnect the lower arm (A) to the knuckle. Install the 12 mm castle nut (B) and tighten it.
NOTE:
- Be careful not to damage the lower ball joint boot (C). Check the ball joint boot for dent and other deformation before connecting the knuckle.
- Tighten all mounting hardware to the specified torque values. Torque the castle nut to the lower torque specification, then tighten it only far enough to align the slot with the joint pin clip hole. Do not align the castle nut by loosening it.
 |
| 14. | Install the new lock pin (D).
NOTE: Insert the lock pin from the inside to the outside of the vehicle.
|
| 15. | Install the front splash shield (A), and rear left and right splash shields (B).
  |
| 16. | Move the steering column to the uppermost position, and pull up the tilt lever firmly.
|
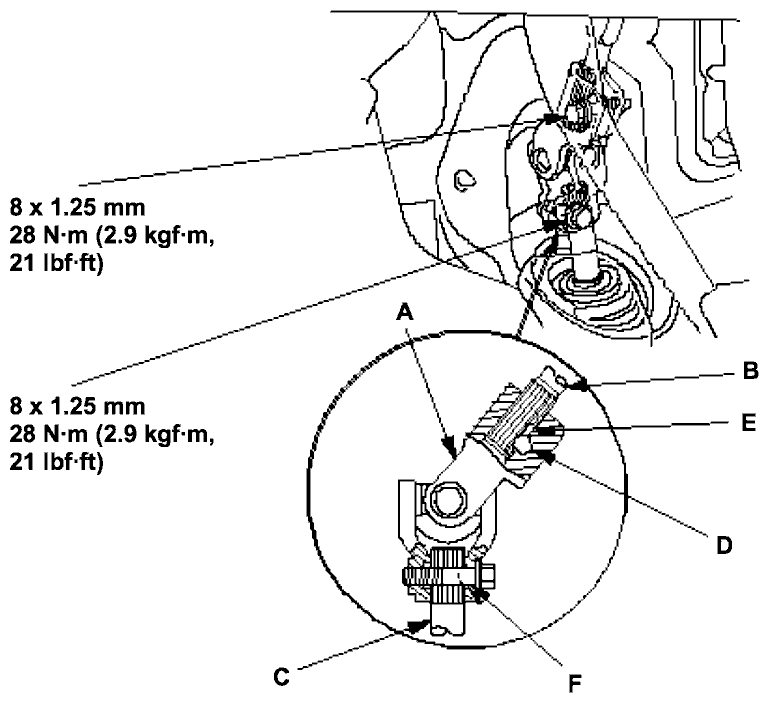
| 17. | Install the steering joint (A), and reconnect the steering shaft (B) and pinion shaft (C). Make sure the steering joint is connected as follows:
- Insert the upper end of the steering joint onto the steering shaft (line up the bolt hole (D) with the flat portion (E) on the shaft).
- Slip the lower end of the steering joint onto the pinion shaft (line up the bolt hole with the groove (F) around the shaft), and loosely install the lower joint bolt. Be sure that the lower joint bolt is securely in the groove in the pinion shaft.
- Pull on the steering joint to make sure that the steering joint is fully seated. Then install the upper joint bolt and tighten them to specified torque.
 |
| 18. | Install the steering joint cover.
 |
Install the steering wheel.
| 20. | Install the front wheels.
|
| 21. | Holding the tyres raised off the ground (lifted up), check for the following symptoms by turning the steering wheel fully to the right and left several times.
| Symptom | Probable cause |
|---|
| Rubbing sound with the resin from around the foot space. | Steering joint being in contact with the cover. | | Grating from around the foot space, or grating feeling or resistance during steering. | Poor engagement of motor shaft serrations. | | Periodical swell of steering force. | Improper connection (forced connection) of the steering joint. | | Clattering noise around the steering wheel. | Poor engagement of the SRS cable (if so equipped) with the steering wheel(or damaged cable).
|
|
| 22. | Lower the vehicle on the ground, and connect the negative cable to the battery.
|
| 23. | Check and adjust the front wheel alignment.
|
Check the power assist to see whether the normal assist is available.
Test-drive the vehicle;
- Check that the EPS indicator does not come on.
- Check the steering wheel spoke angle. Adjust by turning the right and left tie-rods equally, if necessary.
Spoke angle can get out of position during removal and installation of the rear beam or caused by poor engagement of the steering joint serrations.
If steering angles to the right and left are not equal, correct the engagement of the joint/pinion shaft serrations, and adjust the front toe.
Honda Fit/Jazz 02-05 Workshop Manual
Back to all Manuals